




How to Pack Dishes for Moving
 Lifestyle Moving & Storage
The Short Answer
Pack dishes on edge, never flat. Wrap every piece individually in clean packing paper, stand plates upright in a sturdy small or medium box, or a double-wall dish barrel, lined with crumpled paper, cushion the sides and top, and keep every box inside its weight limit, which runs from 30 pounds for a small box to 45 pounds for a dish barrel.
Plates standing on edge take pressure through their strongest point. Plates stacked flat put the weight of the entire stack on the bottom plate, and one bump in a stairwell cracks the whole column.
That is the core of it. Everything below is the detail that keeps your kitchen intact from a fourth-floor walk-up, onto the truck, and out onto your new counter.
What You Need Before You Start
Do not improvise with grocery bags and old liquor-store boxes. Used boxes have already been compressed once, and a box that barely survived the trip into your apartment will not survive the trip out.
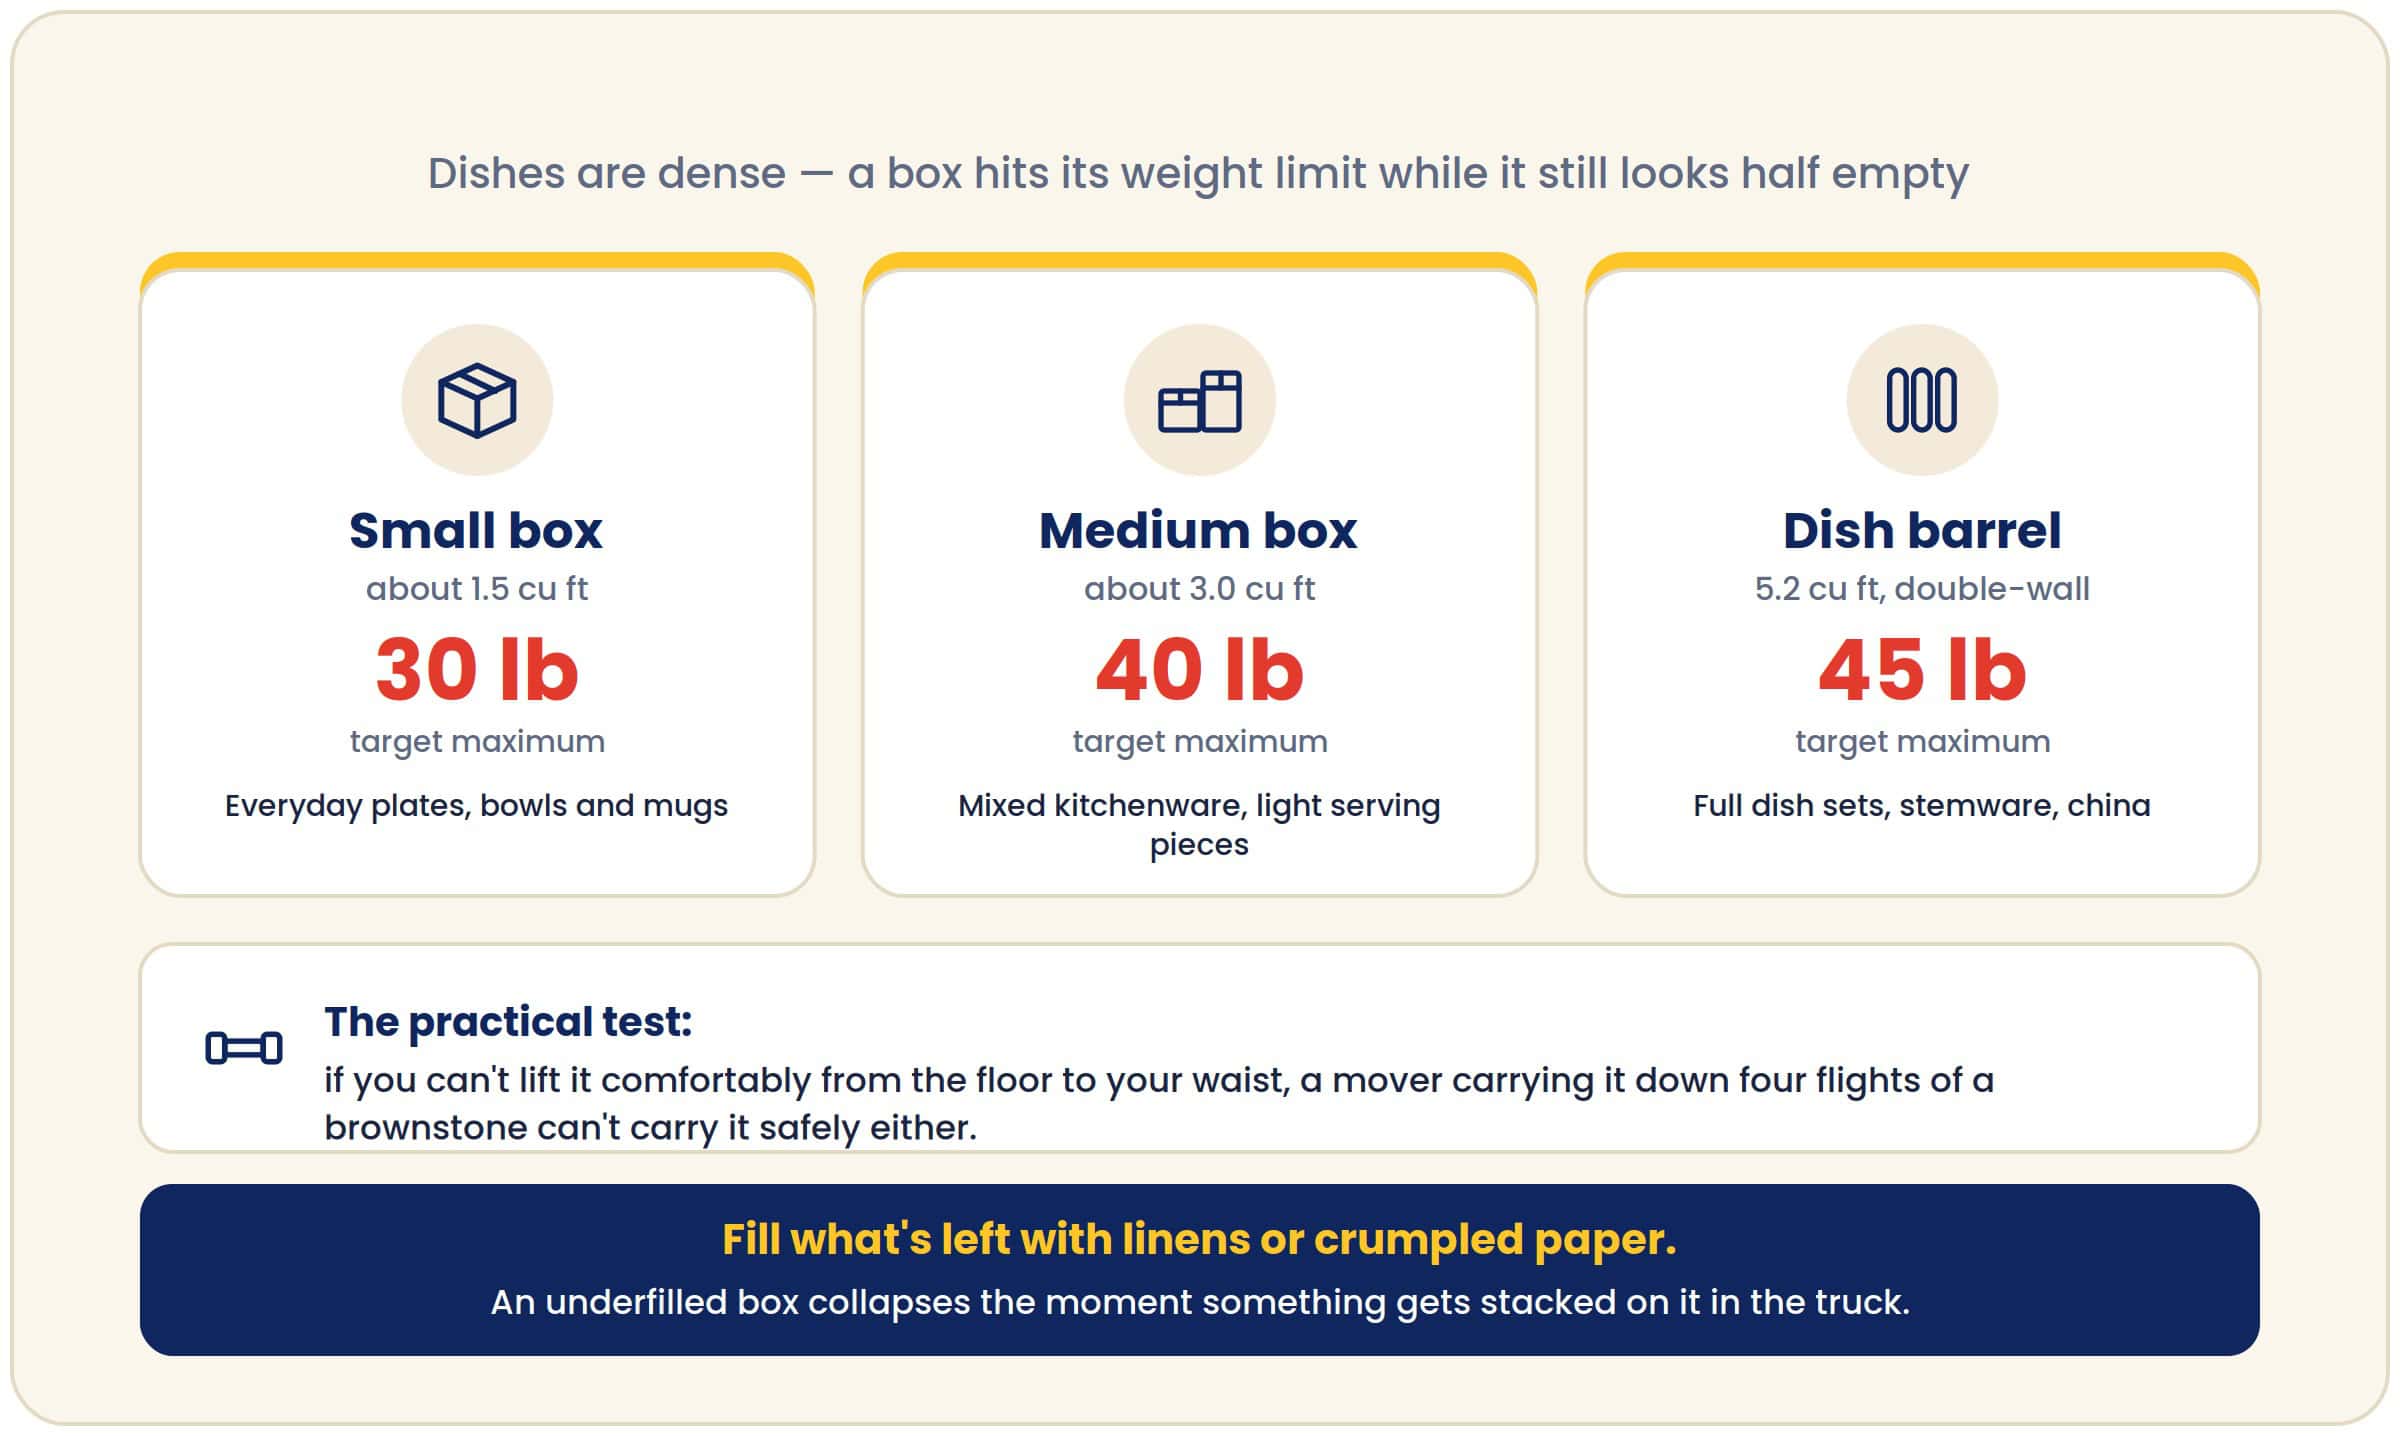
Skip newspapers for anything you eat off. The ink transfers, and you will spend your first night in the new place washing a full dish set instead of ordering takeout. If you want the exact materials our crews carry, the packing supplies page lists what we bring to every job.
How to Pack Dishes for Moving, Step by Step
1. Build the box first
Tape the bottom seam, then run a second strip of tape across it in the other direction. Dish boxes carry more weight per cubic foot than almost anything else in your kitchen, and the bottom is where they fail.
Line the base with 3 to 4 inches of crumpled paper. Press it down. You want a springy cushion, not a flat mat.
2. Wrap plates in pairs
Lay a sheet of paper flat. Center a plate on it. Pull one corner over the plate, add a second plate on top, then fold the remaining corners in and around both. Tape the bundle closed.
Pairs are the sweet spot. Single wrapping wastes paper and time. Stacks of four or more turn into one heavy brick that cracks as a unit.
3. Stand plates on edge
Load the bundles vertically, like records in a crate, running front to back. Heaviest and largest at the bottom of the box, lighter salad and dessert plates above.
If heavy stoneware bakeware is going into this box, lay it flat on the bottom cushion before any plates go in. Better still, give bakeware a box of its own. A few pieces eat most of a dish box’s weight limit on their own.
Every gap gets filled with crumpled paper. When you are done with a layer, press down. Nothing should shift.
4. Bowls go next
Nest no more than three bowls with a sheet of paper between them, then wrap the whole nest as a single bundle. Deep bowls sit upright in the middle layer. Shallow bowls can stand on edge with the plates.
5. Mugs and cups get their handles protected first
Handles snap more often than any other part of a dish set. Wrap the handle on its own with a small piece of paper before you wrap the mug, and stuff a crumpled sheet inside the cavity so the walls cannot flex.
Place mugs upright in the top layer, or use cell dividers.
6. Stemware always stands up
Crumple a small piece of paper into the bowl of the glass. Wrap the stem separately, then roll the glass diagonally in a full sheet so the paper tightens around the stem. Cell dividers do the rest. Wine glasses laid on their sides will not survive a truck ride over Manhattan potholes.
7. Platters and oversized pieces
Serving platters, large cutting boards, and shallow casseroles go vertically along the side wall of the box, wrapped in paper and then a layer of bubble wrap. Heavy stoneware bakeware is the exception, and it goes in flat at the very bottom before anything else, as covered in step 3.
8. Cushion the top and do the shake test
Add 2 to 3 inches of crumpled paper across the top before you close the flaps. Then lift the box a few inches and give it a gentle shake. If you hear movement, open it and add more paper. A box that rattles in your kitchen will rattle for the entire ride.
Tape the top seam, then tape the corners.
Packing Fine China and Heirloom Pieces
Everyday dishes are replaceable. Your grandmother’s china is not, so it gets a different treatment.
- Two layers, always. Paper against the glaze first, bubble wrap over it. Bubble wrap directly against delicate gilding can leave marks in a hot truck.
- Foam pouches for gold and platinum rims. Decorated rims chip before the plate body does.
- Box inside a box. Pack the china in a small box, then set that box inside a dish barrel with 2 inches of cushioning on every side.
- Crating for the irreplaceable. Antique porcelain, large serving pieces, and anything with a documented value are safer in a custom crate than in cardboard. Our antique packing crews handle this every week.
- Photograph everything before it goes in. If you ever need to file a claim, condition photos with a date stamp make the process fast instead of frustrating.
If a piece is genuinely valuable, ask about full value protection before move day rather than after.
How Much Weight Should a Dish Box Hold?
This is where most self-packed kitchens go wrong. Dishes are dense, so a box looks half empty right as it hits its weight limit.
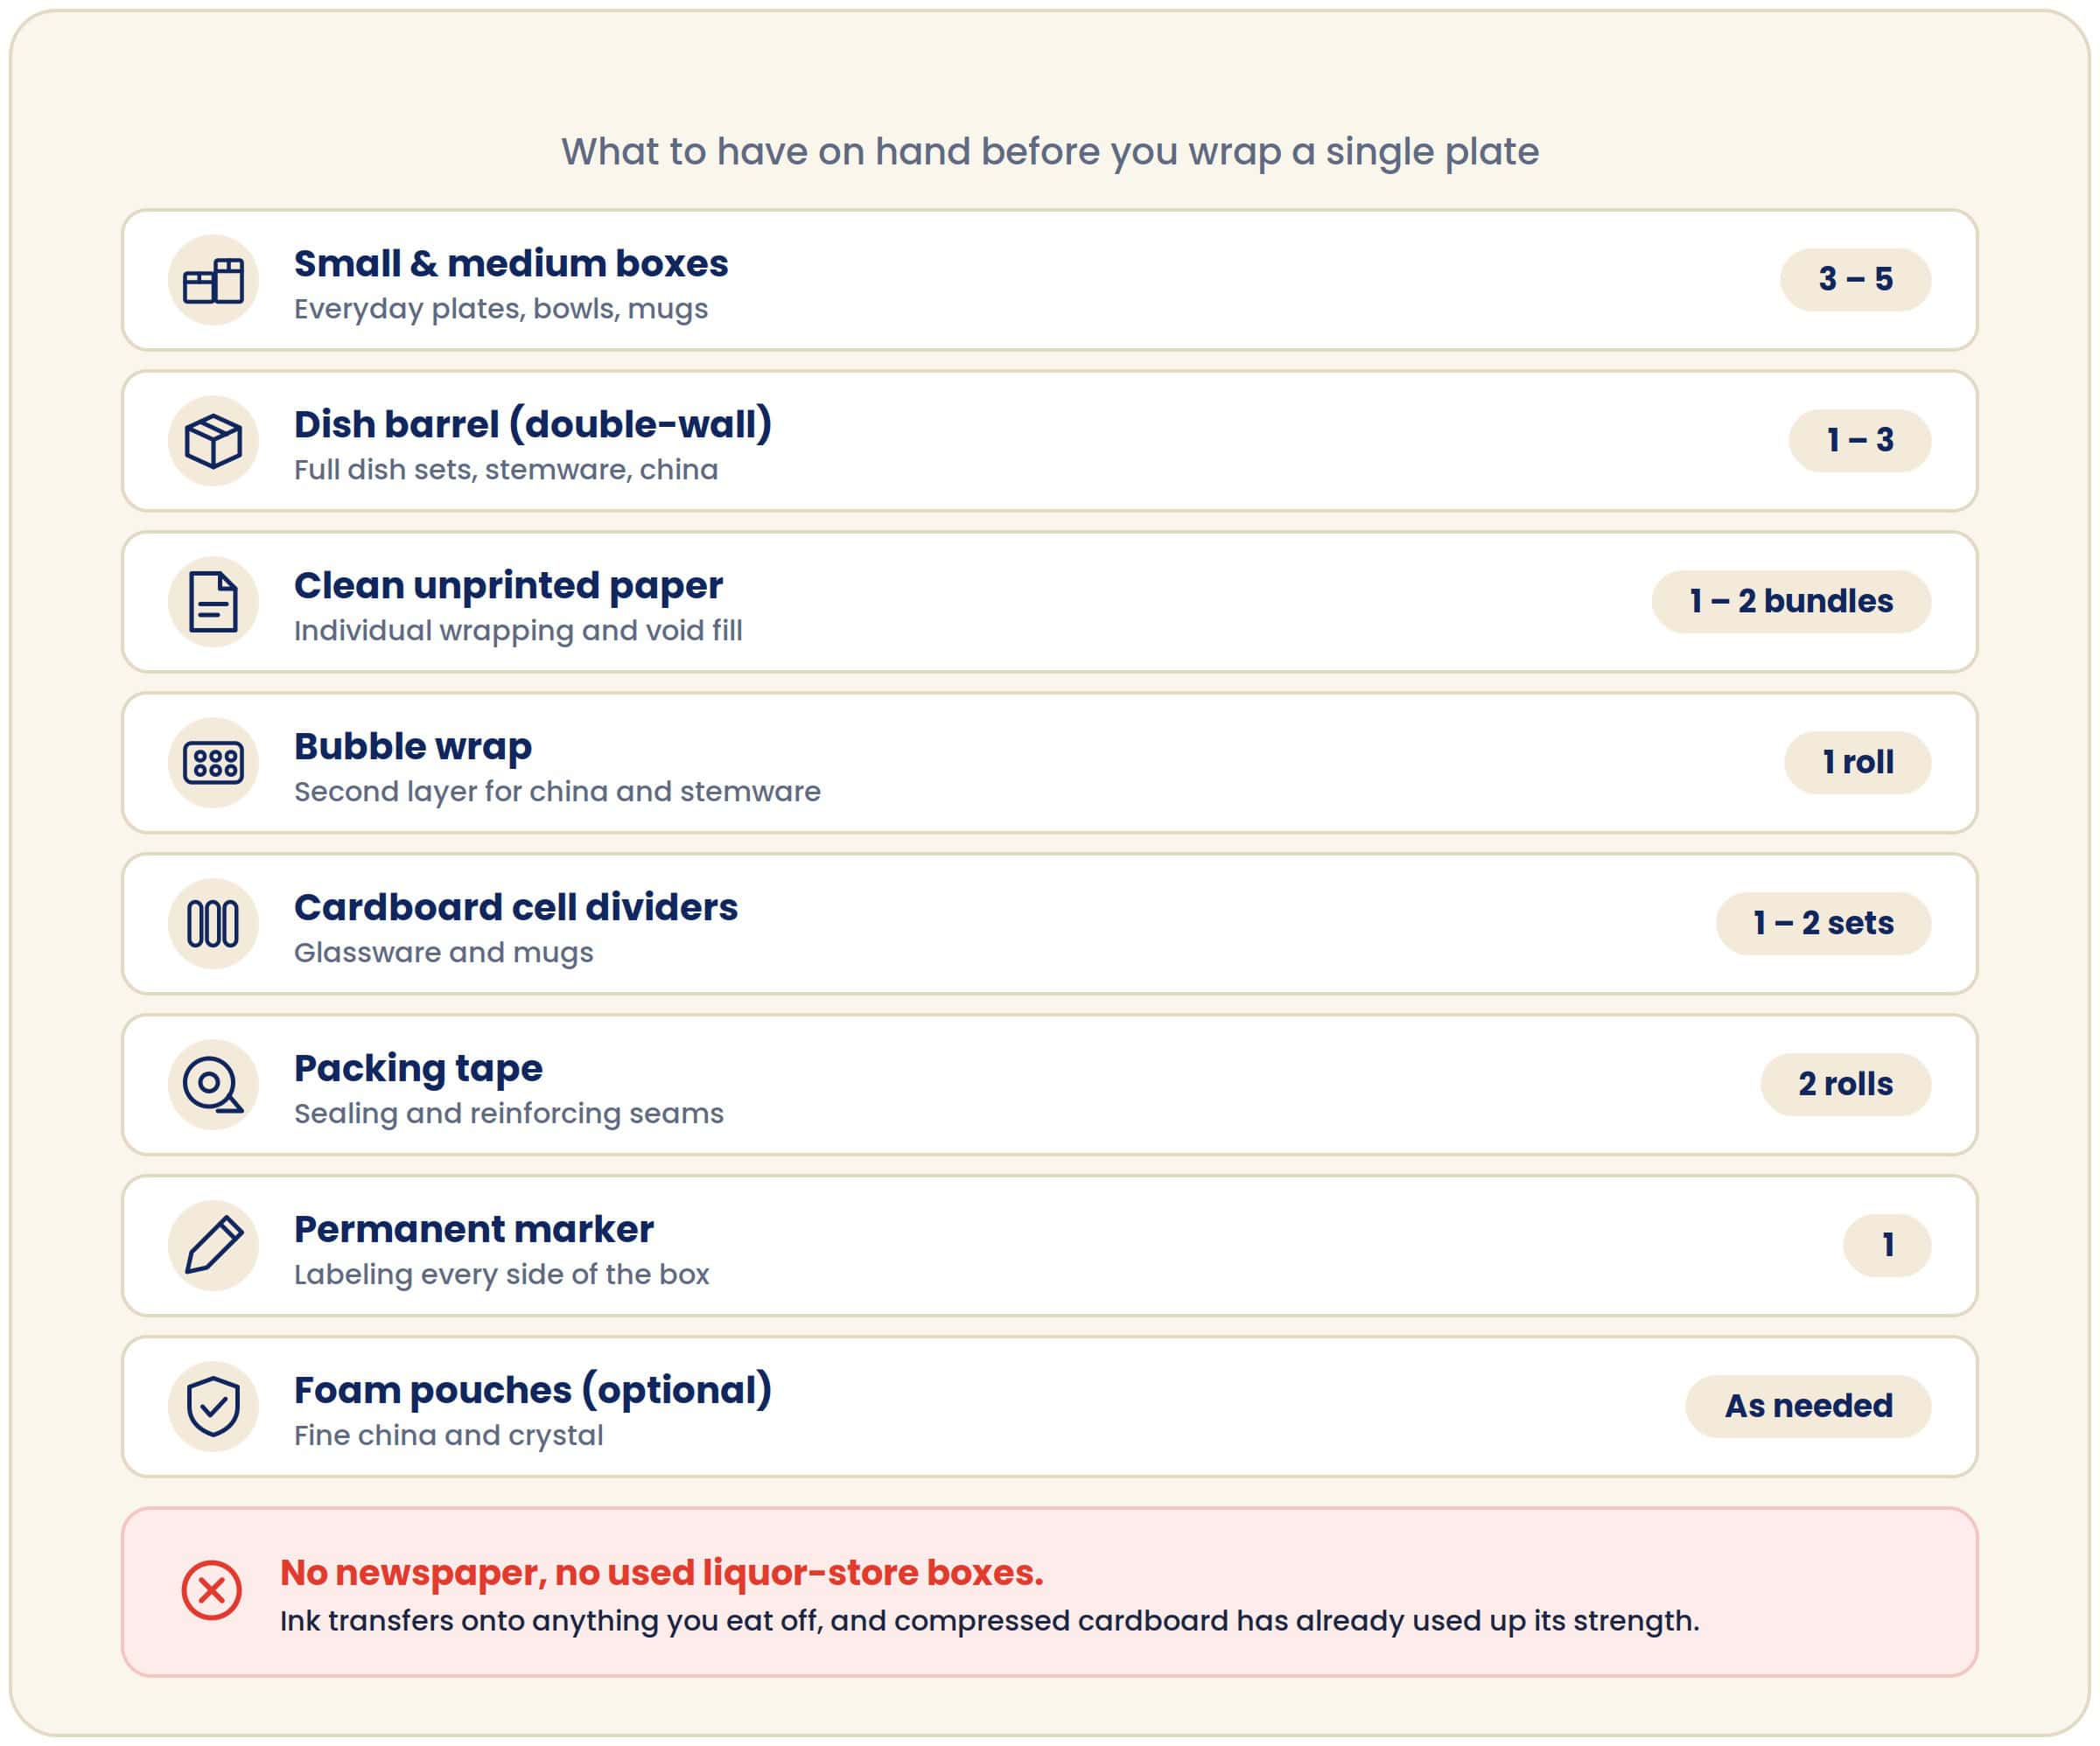
The practical test: if you cannot lift it comfortably from the floor to your waist, a mover carrying it down four flights of a Park Slope brownstone cannot carry it safely either. Take pieces out and start another box. If you are short on containers, our moving boxes page covers what each size actually holds.
Fill the remaining space with light kitchen linens or crumpled paper. An underfilled box collapses when something gets stacked on it in the truck.
Labeling That Actually Helps on Move Day
Write on the sides, not the top. Once boxes are stacked in a truck or a hallway, the top is the one surface nobody can see.
Every dish box gets:
- FRAGILE on all four sides
- THIS SIDE UP with an arrow
- KITCHEN as the destination room
- A short contents note such as “dinner plates and bowls”
- A count such as “Kitchen 3 of 6”
The contents note is what saves your first evening. You will know exactly which box holds four plates and four glasses instead of opening five boxes to find them.
NYC Specific Things That Break Dishes
Moving a kitchen in New York is not the same as moving one in a suburb with a driveway and a ground floor garage.
Stairwells and walk-ups. Boxes get carried at an angle around tight landings. Vertical plate packing and a full box with no void space are what keep pressure off individual pieces on the way down.
Long carries and elevator staging. In a doorman building your boxes may sit staged in a service corridor while the elevator window runs. Staged boxes get stacked. A weak or overfilled dish box is the one that gives out.
Loading zone distance. If the truck cannot park at the door, everything travels farther on a dolly over uneven sidewalk. More vibration, more reason to eliminate rattle.
Gap days between leases. If your dishes are going into climate controlled storage between closings, that unit needs to be climate controlled for a reason. Temperature swings and damp air warp cardboard, and warped boxes stop protecting what is inside.
Our crews wrap furniture, protect floors, doors, and hallways, and coordinate elevator windows and the Certificate of Insurance (COI) with building management as standard. What we ask of you is simple: pack your kitchen properly, or let us pack it.
Common Mistakes That Break Dishes
- Stacking plates flat. The single most common cause of cracked dinnerware in a self-packed kitchen.
- Reusing thin grocery or liquor boxes. Single-wall cardboard that has already been compressed will not hold 30 pounds of stoneware.
- Leaving air pockets. Empty space is movement, and movement is impact.
- Overpacking because the box “looks” light. Weight, not volume, decides when a dish box is full.
- Using towels as the only cushioning. Towels are fine as void fill at the top. They do not wrap tightly enough to protect a rim.
- Packing peanuts under dishes. Heavy pieces sink through them and end up resting on the cardboard.
- Skipping the mug handles. Wrap them separately every time.
- Taping directly to fine china. Tape pulls on glaze and gilding. Tape the paper, never the plate.
Unpacking Without Undoing Your Work
Open dish boxes on a cleared counter or table, never on the floor where a wrapped bundle can be stepped on. Work from the top layer down, and keep a trash bag open next to you for used paper so the pile does not swallow a wrapped mug.
Set out a “night-one” box first: four plates, four glasses, mugs, and basic flatware. Label it clearly and load it last so it comes off the truck first.
Flatten and keep the dish barrels. If you have a second move ahead, or a storage unit to unload later, double-wall boxes are worth holding onto.
When It Makes Sense to Hand Off the Kitchen
A kitchen is the slowest room in any apartment to pack and the one with the most to lose. If you are staring down a full dish set, a shelf of stemware, and a move date two weeks out, packing it yourself is doable with the steps above. It just takes time you may not have.
If you would rather not spend a weekend wrapping plates, our packing services cover kitchens start to finish, materials included, with the option to have us unpack on the other end. If you are packing yourself but short on the right containers, we can drop off dish barrels, cell dividers, and clean paper before move day. And if there is a gap between leases, climate controlled storage keeps your boxes out of the temperature swings that warp cardboard.
Questions about your specific kitchen, your building’s elevator window, or what a flat rate would look like? Call us or request a quote, and we will walk through it with you.

EXPERT NYC MOVERS & STORAGE SOLUTIONS
Looking for the best place to get moving and storage solutions in NYC? Look no further than Lifestyle Moving & storage! We are the leading provider of moving and storage solutions in NYC, and we’re here to help make your move as pleasant as possible.
We are fully licensed and insured and offer a wide range of services to meet your moving and storage needs. We are a one-stop shop for moving and storage. Contact us today.
